I installed Windows 10 a few weeks ago (finally) so I could take advantage of the sweet new developer features, specifically Docker and WSL2.
I’ve been playing with a small project to sharpen my grasp on it all. Let me save you some struggle by sharing my research with cross-compiling C++ using a Docker container. I’m not entirely sure how useful this is in real practice, but it sure is some cool stuff.
Tools required for this exercise are just Docker Desktop and the ability to download a Git repository. I suppose that’s the beauty of this – any additional tools required to compile this project are contained.
I published an example project to go along with this, which can be found at
https://github.com/mukunda-/docker-cpp-example
I’ll be referencing this throughout the article.
Clang vs GCC
I’m not entirely sure of the pros and cons of each. I’ve used MSVC++ for most of my experience. As far as I know, both of these are very good compilers with great support, but my gut feeling told me that Clang is hip and cool so I went with that.
In all honesty, I think GCC might be a better choice for compiling inside of containers. It’s a bit difficult to take advantage of Clang’s neat developer features when it’s all stuck behind a container, and a lot of existing code and projects will likely better align with GCC.
Setting up the Environment
Under the clang folder, I have a Dockerfile that builds an image that contains Clang and other useful tools like Python.
#------------------------------------------------------------------------------
FROM ubuntu:20.04
LABEL maintainer="mukunda@mukunda.com"

#------------------------------------------------------------------------------
# Any packages we want plus essentials for the clang installer.
RUN apt-get update && apt-get install -y \
   cmake                                 \
   curl                                  \
   gdb                                   \
   lsb-release                           \
   python3.8                             \
   software-properties-common            \
   wget                                  \
   xz-utils

#------------------------------------------------------------------------------
# Copy script(s).
COPY . /

#------------------------------------------------------------------------------
# Install clang and do some housekeeping.
RUN ./install_clang.sh \
    && rm -rf /var/lib/apt/lists

#------------------------------------------------------------------------------
# (Default entrypoint is /bin/bash)
#
#------------------------------------------------------------------------------
Basic steps here are installing the tools that we will use and then running my clang installer script – a simple wrapper over the LLVM nightly packages from https://apt.llvm.org/.
The rm -rf /var/lib/apt/lists might be confusing to beginners. This is just a recommend hack to clean up temporary files from the package manager for the final image. Usually it’s attached to the main apt-get install line, but in this case we’re not quite done until the bottom scripts executes.
Keeping the Docker cache in mind is important when writing Dockerfiles; you can read more about that in Dockerfile Best Practices. I suggest reading that whole page if you haven’t.
To build and run this container, I’m using docker-compose. If you aren’t familiar with that, it’s a Docker tool to manage setting up a complete environment with multiple containers to run your project. I just have one container in this project, and the compose file is here:
#------------------------------------------------------------------------------
version: '3'
services:
   #---------------------------------------------------------------------------
   # A lightweight environment for compiling C++ and debugging with gdb.
   clang:
      # Build our image.
      build: ./clang
      image: clang
      container_name: clang
      hostname: clang

      # Idle in bash. Can attach to this but most things will just be exec
      # commands.
      command: /bin/bash
      tty: true

      # Like -i to keep the container alive when we aren't attached.
      stdin_open: true

      # For debugging.
      privileged: true

      volumes:
         # Map working directory to /wd.
         - .:/wd

         # Map build volume to /build.
         - build:/build

#------------------------------------------------------------------------------
volumes:
   # This is where the project will be built - a volume inside of the
   # container. Contains any temporary build files and the results.
   build:

#------------------------------------------------------------------------------
To start the environment, all you have to do is run docker-compose up. This will build the Dockerfile for clang and start hosting a container for it. When you’re done working on this project, docker-compose down will clean up for you.
I’ll go over some of the options in this file.
The build option is one way to link a service to an image; this basically says to build from a specific Dockerfile that you have. Services can also be made from images on Docker Hub and such.
The command here isn’t really important or used. This just makes it so the container doesn’t die immediately. tty causes it to allocate a “pseudo-tty”; I don’t know what that is, but it allows us to attach to the container. Try it out: you can run docker attach clang to access the bash shell in the running container. Ctrl+P Ctrl+Q will let you exit the container without killing it.
stdin_open is important so bash doesn’t quit immediately from the input not being present.
I don’t know the implications of privileged, but I saw another example of using it for running debuggers.
I find docker-compose to be especially convenient when
mounting volumes. Normally, to mount your local filesystem
into the container, you need a long --mount option, such as
docker container run -it --mount
type=bind,source=C:/full/path/to/my/folder,target=/wd clang
.
In this case, we’re mounting two volumes; one is our build
volume, the other is our working directory (a “bind mount”).
This means that inside of the container, we can access any
file in our working directory under /wd.
At the bottom of the file I define the build volume which was also mounted in the container under /build. This is neat. Rather than creating a build folder inside of the working tree, the temporary files are all kept inside of the container.
Volumes like this persist between sessions; if you do docker-compose down, it won’t be deleted and will be restored the next time you do docker-compose up. Essentially this is good; even though this is just a temporary build folder, you don’t want to do a complete recompile of everything every time you set up your environment.
Configuring VS Code
Now that we have our environment set up, we can configure Visual Studio Code to use it. VS Code loads its build and debug/launch configurations from .vscode/tasks.json and .vscode/launch.json.
Here is a tasks.json file to build our project:
//-----------------------------------------------------------------------------
{
   "version": "2.0.0",
   "tasks": [
      {
         // Our task for building the project in debug configuration.
         "label":   "Build Debug",
         "type":    "shell",

         // Executing a command in our clang host to run the build python
         // script (executing the python script inside the container).
         "command": "docker-compose",
         "args": [
            "exec",
            "clang",
            "/wd/scripts/build.py",
            "--build", "debug"
         ],

         "group": {
            // Default build action.
            "kind"      : "build",
            "isDefault" : true
         }
      }
   ]
}
//-----------------------------------------------------------------------------
This sets up a default build command (accessed from the default keystroke Ctrl+Shift+B). Pretty straightforward here; this runs the command
docker-compose exec clang /wd/scripts/build.py --build debug
You’re probably already familiar with docker container exec, but this is a way to execute a command in a running service that was setup through a compose file. clang is the service name, and then we’re telling that service to execute our Python script to build the project. This script might be overkill for a small example, but essentially all it does is runs cmake in the build folder (located in the build volume) and then make to compile.
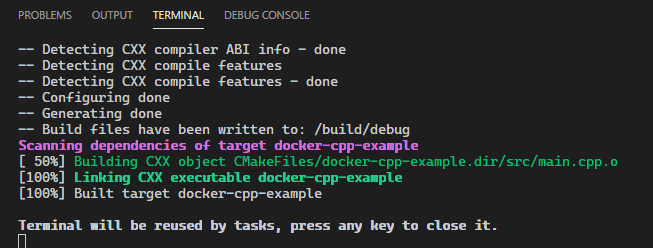
Once this build task is done, the container should have a complete build! The VS Code terminal should show the compiler output.
Debugging
This was a headache and a half to set up. I started by trying to get lldb to work. It seems like the logical choice since I chose Clang, but it’s really not that simple in practice. While VS Code does support lldb as of this writing, it only supports “lldb-mi”, which is essentially a more machine-friendly protocol.
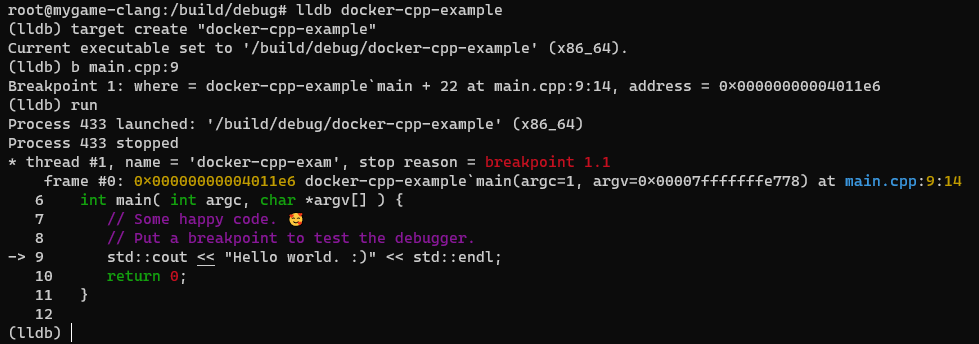
VS Code for macOS ships with a build of lldb-mi that makes it all work, but to get lldb-mi for your ubuntu container is not something easily obtainable yet. Hats off to anyone making contributions in that area. You can still try out lldb directly in the container.
Anyway, I ended up using gdb which is easy to set up and compatible with VS Code. I mean, in the end, does it really matter which debugger backend you’re using?
First thing you need to do to debug C++ stuff in VS Code is install the C/C++ extension from Microsoft.

Then we can configure launch.json to start a debug session:
//-----------------------------------------------------------------------------
{
   "version": "0.2.0",
   "configurations": [
      {
         // Our debugger launch configuration.
         "name": "Docker Debug",
         "request": "launch",

         // Launch configuration type. This targets gdb.
         "type": "cppdbg",
         "MIMode": "gdb",

         // What program to execute - this will be a path inside of the
         // container.
         "program": "/build/debug/docker-cpp-example",
         "args":    [],

         // The working directory for the debuggee; docker-compose
         // configuration will mount our workspace folder to /wd.
         "cwd": "/wd/env",

         // Don't pause the debugger upon launch.
         "stopAtEntry": false,

         // Use the integrated console in vscode.
         "externalConsole": false,

         // Not entirely sure what this does.
         "avoidWindowsConsoleRedirection": true,

         // Call the build task first; ideally we'd want to avoid this if we
         // are already up to date, but that is out of the scope of this
         // example.
         "preLaunchTask": "Build Debug",

         // pipeTransport allows us to run a debugger through a console or
         // such.
         "pipeTransport": {
            // Working directory that the command will be executed - the
            // workspace folder.
            "pipeCwd": "${workspaceFolder}",

            // We're going to start the debugger in our container from
            // docker-compose.
            "pipeProgram": "docker-compose",
            "pipeArgs": [
               // -T is to disable allocating a TTY. I don't know what effect
               // that has exactly, but it doesn't work otherwise.
               "exec", "-T",
               "clang",
               "bash",

               // Kind of weird that we end with this, but as far as I know,
               // the debugger command is plainly appended right to the end of
               // the command string along with arguments.
               "-c"
            ],
            "debuggerPath": "/usr/bin/gdb"
         },

         // Map the working directory mount in the debugger/container
         // environment to our workspace.
         "sourceFileMap": {
            "/wd":"${workspaceFolder}"
         }
      }
   ]
}
//-----------------------------------------------------------------------------
A lot of stuff here! For a high-level overview: this basically starts a debugger through an arbitrary command and then describes how it should be used.
pipeTransport is used to start a debugger like this, and you can read more about that here. Here we are using docker-compose to start the debugger inside of the container. clang is our service name.
type and MIMode selects what kind of debugger is being used. I assume this correlates to something inside the C/C++ extension. Using the pipeTransport settings, VS Code will start the debugger using that, and then communicate with it. MIMode can be either lldb or gdb, but as described above lldb is a no-go for now.
Options like program and cwd are neat because they specify container paths. That seems a little magic to me, but I assume there are some commands in gdb to handle those.
The preLaunchTask should make sure that the program is up to date. I’ve noticed this takes a bit of time (every docker-exec compose seems to take some time to start-up); in the future I’d probably want to look more into this to avoid that step if it’s unnecessary.
sourceFileMap should map the paths in the container (the paths the debugger sees) to the paths in your workspace, basically just reversing the bind mount.
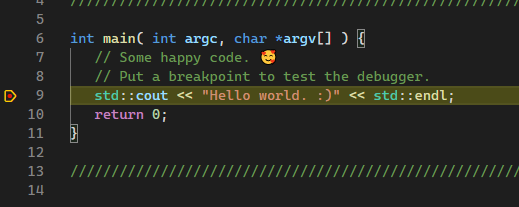
Once all this is set up, you should be able to press F5 and start a debug session. Try it out by setting a breakpoint.
Drawbacks
Ah yes, the cons. As fun as all of this is, there are probably some serious drawbacks here compared to a native environment. Firstly, it will be a hassle to hook up any additional tools, such as the Clang daemon for intellisense support. It’s probably also not very performant to operate on code in a bind mount in a virtual environment. (As if C++ compilers weren’t slow enough already. :)
An alternative solution is to have your workspace located entirely in a container. VS Code has special support for that, and you can read more about that here. I’ll probably look more into that myself as it seems very fun. The only thing I’m not a fan of is… well, my workspace being entirely in a container.
If everything is on the container side, any native program will have to jump through a hoop to access my files. While VS Code will have a smooth time with it, there may be other things that won’t.